Hello Friday! Even though I'm retired, there is still something about weekends that makes me go "aaahhhhhhh".
We have friends who's first of three sons has just gotten married. Today, I'm sharing a card for the newlyweds.
Before I get started, I want to thank those of you who have sent mail to our DD or her DH. If you would like to see just how much one kind word from a stranger makes a difference, please read
this blog entry of DD's. If you don't have time or money to send cards, even a simple caring comment on her blog might make the difference in her day. Thanks everyone!
Now! Some of you have emailed me asking for a tutorial on how I did this card:
I wish I could take full credit for this beautiful card/technique, but if you recall, this was one of the projects
Shirley had for us to do the last time I went to her 'playroom' for a girl's day in'.
Since this technique is perfect for the wedding card I needed to make, it seemed the perfect time to post a tutorial. Warning - LOTS of photos!
 |
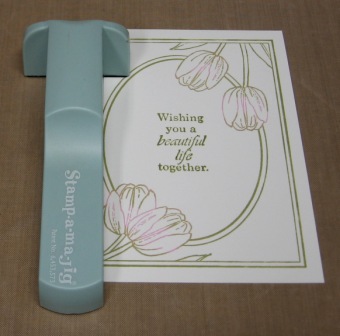
| Here's what you need: Stamps (Gina K. Designs 'Beautiful Life'), Inks (Colorbox Fluid Chalks), White CS (GKD Pure Luxury White), Stamp-a-ma-Jig, and sponge daubers. |
 |
| Working with your lightest color first, daub ink on the flowers. The chalk ink that I used, will remain moist for some time, no need to huff before stamping. |
 |
| Using darkest color, finish daubing on color. |
 |
| Stamp image onto cardstock, being sure to place even pressure for full covrage of image. |
 |
| Now, you will need some inks for your butterflies. Again, daub on your lightest color first, then your darkest color. |
 |
| Voila! Ready to fussy cut! |
 |
| For the sentiment placement, I use a Stamp-a-ma-Jig. If you don't have one of these, it is probably the best ten bucks I've ever spent. Seriously! |
 |
| First, you will place your stamp on an acrylic block. Taking the plastic square, you will butt it up against the corner of the Stamp-a-ma-Jig. (Some people do this at the bottom of the tool - I prefer working at the top of the tool. Your choice!) Now, take your stamp, ink it up, and place it in the corner, flush against the tool, and stamp image. |
 |
| Now, place the plastic over the main focal image. When the placement is exactly where you want it to be, move your tool up to the corner of the plastic, and be sure that nothing moves. When it's exactly where you want it, remove the plastic.... |
 |
| and replace the plastic with your inked stamp. |
 |
| Your sentiment should be exactly where you wanted it to be! |
I should add that the green band at the bottom of the example card is simply a piece of a muse cardstock, cut to size, scored repeatedly, and sanded.
Thanks for stopping by today! Hope to be by soon to visit with you, but the lightning has begun again, so it might be a while!
Blessings,
Patti J.


31 comments:
Oh, gosh...I love that card! Great tutorial Patti!
This is such a beautiful design!
Love your tutorial, you did a wonderful job with each step.
I need to pull out my stamp a ma jig, I always forget about using it.
I am sorry I haven't mailed out cards for Melissa, I even have them picked.
I will get that done today, she has been on my mind.
Take care and have a great weekend sweetie
Gorgeous card. Enjoy the weekend, Annette x
Wonderful tutorial and such a pretty, pretty card!
Oh my word this is a beauty Patti!!!! I LOVE it, and your tutorial is WONDERFUL!!!! GORGEOUSNESS girl!
Beautiful card! Thanks for sharing your great techniques and a how to for the SAMJ! Some people are scared of the little tool! I agree it's a great investment! TFS!
absolutely gorgeous! i'm still trying to figure out that thing-a-majig (after 9 years).
do you need ribbon? i may just surprise you and send you some!
hugs :)
Outstanding tutorial!!!! Love the card,
Great tutorial! Sure makes for a beautiful card! Enjoy your weekend (0=
Another beautiful creation Patti! Enjoy your weekend!
Gorgeous card and a great photo tutorial Patti. Think you got enough ink pads......LOL We are sure having some beautiful weather this week and so enjoying have the house open. Have a fab weekend! "Hugs"
Oh my this is so beautiful. Loved your tutorial too. Seems my first experience with your DD made us both cry....she is a sweetheart!
Hugs
Sue
Beautiful card Patti, and thanks for the tutorial!
Beautiful card and fab tutorial too! Have a great weekend!
Lynne
x
What a beautiful card - I didn't know you had this Gina K. set - hmm...we may have to play with it for our next "play date". Very nice tutorial too.
Gorgeous!
Patti this is so PRETTY!!~
Gorgeous card, Patti! Thanks for the quick tutorial.
Have a great weekend!
Hugs and smiles
Magnificent cards, Patti! Thanks for the tutorial, it are so interesting.
Hugs, Helena.
A wonderful card with a perfectly placed sentiment. Great tutorial too. What would we do without our stamps-a-ma-jigs? Happy St. Patrick's Day!
Beautiful card, enjoyed the tutorial!
great tutorial-thanks for sharing!
What a beautiful card and wonderful tutorial, Patti....I never think to use my stamp a ma jig!!! Thanks for the inspiration!!!
Love the card and tutorial Patti. Gosh wouldn't that be awesome if you lived closer ... I would LOVE that!!!
I know what you mean about not knowing what's safe and what's not safe when it comes to online shopping. It sure can be a worry. Tomorrow I call and report the incident to headquarters. I'm hoping I wont get dinged for fraudulent charges. Big hugs ... Carole xox
Morning Patti, Love the card and tutorial, its so pretty and never seen the Stamp a ma jig before.
Called by Melissa's blog and left her some love xxxxxxx They are always in my prayers, and I love to hear how she is and whats happening in her life xx
Huge Hugs Mau xx
So beautiful Patti!! LOVE your frame and the different colors variated in the images!! Such a great tutorial and thanks for sharing!! :) HUGS
Beautiful Patti! Love the colours and thank you for the tutorial.
Thank you for the lovely comment on my blog, specially for Sarah!
Hugs xx
FAbulous step by step tutorial Patti! I haven't done this technique in a long time. Thanks for refreshing my memory and inspiring all of us. Beautiful project!
so pretty Patty! love how you did the butterfly on the first card!
Your card is so pretty and I really like your tutorial. So easy to follow.
Thank you so much for sharing! :)
wonderful tutorial, Patti! and beautiful card!!
Post a Comment