Showing posts with label E-Z Runner. Show all posts

Tuesday, December 31, 2013

Zzzzz......

Happy almost 2014!
Sheesh...this year has flown by!

Inside sentiment: It works great!

I don't know about all of you, but this card totally describes how I feel after:
 two full weeks in Germany, followed by two full weeks of Christmas parties, 
foods/candies/cookies, etc.,  and soon to be followed by:
 a New Year's Eve Party, a New Year's Day company, and a Cotton Bowl Party on Friday night!

I am ready to get back to a normal routine, and take off the 5 lbs. I've inherited over the holidays!  I used this stamp set the other day to create a card for my health coaches (which I forgot to photograph!), and decided it was so cute, that I'd use it again!

I'm going to enter it in the challenge at Cardabilities - here is their sketch that I followed. 
Don't you just love a great sketch?

See my beautiful, straight, and even matting?  Used my Perfect Paper Crafting rulers - love, love, LOVE them!  (See my sidebar for details!)  I rarely mat anything without them.
Have a great New Year's Eve!

Hugs, and smiles galore,
Patti J.

Supplies:
Stamps: Creative Vision Stamps CVRR135 Exercise Ball
Perfect Layers Rulers
Quick Kutz Scalloped Die
Spellbinders Circle Die
EZ Runner Adhesive
Pop Dots (Walmart)
Cardstock - DCWV scraps 'Flower Power' collection
Hammermill 100# White CS
Ribbon Scrap
Copic Markers: E00, E21, E31, C1, C3, N00, C00, B93, B95, B97, RV 02, RV04, V17, V15, V12

Saturday, November 23, 2013

Blessings in measures of oodles...

Hi there, and Happy Saturday!  I'm here today with my Scraptownlady post, and have chosen to, again, highlight some of the amazing designer papers that are carried in Cheryl's store.


My first item is the above CAS Christmas card (as many of you have specifically requested CAS!).  I love this beautiful distressed 'enhancement' from Authentique, and it made such a pretty focal image against the matching designer paper.  Hope you like it!  Two sheets of paper, and a few pop dots later, voila!


Lid, complete with Petaloo Flowers

Next up is the above Blessings box.  I have been hoarding this empty oatmeal container for eons and decided this was the right time to alter it.  Again, a very easy project.  I wrapped the container with the designer paper, used cut outs from the 'enhancement' sheet, added a die cut and a few flowers on the lid, and I have a wonderful container to hold all of my blessings.


Just for the record, I am, indeed, blessed in measures of oodles!

Thanks for stopping by today,

Patti J.

Designer Tip:  When you don't have time to color, stamp, or fussy cut, go to your best and easiest resource - Designer Papers and matching elements!

Scraptownlady Supplies:
Authentique 'Traditions' Elements
Authentique 'Medley' (Traditions) Designer Paper
Authentique 'Seasons' Enhancements
Authentique 'Autumn Two' (seasons) Designer Paper
EZ Runner Two Sided Tape
Foam Dimensionals
Scor Tape
Petaloo Flowers
Cheery Lynn Die - Fall Leaf Doily Angelwing (set of 2)
Cheery Lynn Die - Large Leaves 1

Other Supplies:
Empty Oatmeal Container

Saturday, November 16, 2013

Peace on Earth...

Happy Saturday!  I'm here today to share a creation for Scraptownlady.  I totally {{{puffy heart}}} Christmas, so when this darling angel came to live with me, I was so excited!


As you can see, quite a few dimensional foam pieces were added, as this just needed to feel angelic!  There is very little stamping on this creation - it's made mostly with Scraptownlady's beautiful and endless supply of pretty designer papers and stickers!  Be sure to check out all of the Christmas papers!  It's like paper heaven :)

Thanks for stopping by today - hope you'll check out the Scraptownlady store, and blog!

Happy creating,
Patti J.

Designer's Tip:  It's fun to create your shapes with patterned papers.  Step out of the box a bit - clouds don't have to be blue or white, trees can be polka dots, you get the picture!!!

Scraptownlady Supplies:
Melissa Frances/Hampton Arts - Pearl - Angelic Tidings Cling Stamp
Authentique - Traditions Elements (stickers)
Authentique - Peaceful 'Chill' Collection (clouds)
Impression Obsession DIE068-A (clouds)
Tim Holtz Rusty Hinge Distress Ink
Scrapbook Adhesives 3-D Foam Squares
Scrapbook Adhesives EZ Runner Adhesive

Other Supplies:
Amuse Cardstock (base)
Memento Ink
Copic Markers

Thursday, November 7, 2013

Together...

Good morning!

I'm posting today for the Scraptownlady Blog, and I've chosen some beautiful new papers to showcase, as well as a pair of stamps that stole my heart the moment I saw them.  Hope you enjoy my creation!

Isn't this the best ever image?  I love working with the Deep Red Cling Stamps!

Here is the sentiment on the inside of the card.  How sweet it is.  It reads, "Love is what makes two people sit in the middle of a bench when there is plenty of room at both ends".   Sigh....be still my heart!

This is the lower inside, with lots of room to add a personal message.  I had fun with the patterned paper here!


Be sure to check out all the wonderful items in the Scraptownlady Store.  Everything from adhesive to cutting dies can be found there.

Have a great week!

Patti J.

Designer's Tip: When you need a bit of definition, use a fine point marker to 'define' your focal panel.  Makes a great impact on your images!

Scraptownlady Supplies:
Deep Red Cling Stamps - Love Bench Sentiment
Deep Red Cling Stamps - Love Bench
Authentique 'Tradition' Elements (the word TOGETHER on card front)
Authentique 'Tradition' Collection - Chimney and Tinsel Patterns
EZ Runner Adhesive
Spellbinders Fleur De Lis Dies
Tim Holtz Distress Ink - Rusty Hinge
Tim Holtz Distress Ink - Broken China


Other Supplies:
Kraft Cardstock
Amuse Cardstock
Perfect Layers Rulers (see my sidebar for details!)
Memento Ink - Rich Cocoa

Saturday, November 2, 2013

One Stamp, Three Ways!

Good morning! 

It's my day to post for Scraptownlady, and another lovely Flourishes set called to me. I thought I would show you how much fun it is to use a stamp set in different ways.  Here are my cards:

The first card was created by simply coloring the image, mounting it on a piece of pretty designer paper, and adhering it to the card base.

For this card, the image was stamped with a colored distress ink.  Next, the sentiment was stamped in a darker distress ink, directly over the image.  The panel was mounted on pretty paper, then adhered to card base.

Last, but not least, I masked off the upper portion of this card.  The beautiful image was stamped repeatedly in black ink, until the lower portion was covered nicely. A pretty black ribbon, and a few pearls were the perfect finishing touches!

Designer's Tip:  Don't be afraid to think outside the box!  Just because it's a flower image, doesn't mean it has to be colored and 'over'embellished! 

Don't forget to do some of your Christmas Shopping at Scraptownlady!  She has beautiful papers, stamps, embellishments, tools, and much more!  You can find small stocking stuffer items, or larger items like dies! You can also become a follower of the Scraptownlady Blog!  There is new inspirations from Cheryl, and the DT several days each week!

Thanks for stopping by today!  It is an exciting weekend for us.  We are soon to be first-time grandparents, and our daughter is flying in from Germany tomorrow, for her one and only baby shower!  Her in-laws are flying in from Phx., and our son and his fiance from Calif., so it should be a wonderful weekend filled with friends and family!  I've been MIA lately, as I've been busy creating, cooking, cleaning...you know the routine!  Will have lots of photos next week!

Patti J.

Scraptownlady Supplies:
Flourishes 'Picking Wildflowers
Snug Hug Seam Binding - Black
EZ Runner Permanent Two Sided Adhesive
Kaiser Craft Pearls - Black
Pink Paislee Cottage Farms - Bushel - Designer Paper
Little Yellow Bicycle 'Vintage Summer' Paper

Other Supplies:
Black Ink
Perfect Layers Rulers (see sidebar for details!)
White Cardstock (generic)

Saturday, October 26, 2013

Can We Talk?

Happy Saturday!  I'm here today with my post for the Scraptownlady Blog.  A couple of weeks ago, I posted a simple pop-up card, and offered up a tutorial.  Several of you indicated that you would like one, so here goes - warning, lots of photos!

I love this Glamour Girls Stamp Set, and decided to create with it today.  Since it is the Halloween season, purple, black, and green, seemed the perfect color choices!

Here is my finished card:
Isn't she just fabulous?  You can find here in the Scraptownlady Store - see link below!  The text on the purple panel reads HEY, girlfriend!  Sorry about the watermark - couldn't find a good place to put it!

On to the tutorial...

Step 1.  Create your card base.  I chose to use an A2 base, so my card base is 5.5" x 4.25".

Step 2. Finish card as desired.

Step 3.  Create inside piece for pop-up.  It needs to be a bit smaller in length and width than your card base.

Step 3. Here you can see the insert size - I just laid it on the card for the visual effect. Don't glue! You're not finished yet!
 
Step 4. On your folded edge, decide how deep you need your pop-up to be, and draw a 'cheat' line. Find the center of that line.  Then decide how wide you want your pop-up to be and mark those lines..  Mine is about 3/4" wide. 

Step 5. Cut in to your first drawn line.  You'll have a little flappy looking piece like mine above.

Step 6.  Open your insert base.  Use your fingers and gently push inwards on the flap you created.  When you get it like you want it, gently fold your card, and press the flap flat.  It should look like this!


Step 7.  Use adhesive of choice.  Apply to your flap.

Step 8.  Apply your inside sentiment, image, die cut, etc.  Voila!
 It seems confusing, but once you've made one, you can make them without 'cheat' lines, as you will better understand the concept.  You'll soon be moving on to different sized pop-ups in the same card!

Thanks for hanging in with me - this was a long post!  Hope you enjoyed it.  Let me know if there are other things you'd like to see tutorials on - I'm willing to give it a try!

Be sure to check out the Scraptownlady Store for all of your card and scrapbooking supplies!  Also, we hope you will follow the Scraptownlady Blog!  There is always something new and beautiful to see - the DT is amazing!

Thanks again for stopping by,
Patti J.

Scraptownlady Supplies:


Other Supplies:
Black Ink
Perfect Layers Rulers (see my sidebar for details)
Perfect Paper Crafting Centering Ruler (see my sidebar for details)

Friday, August 23, 2013

Make a Splash!

Good morning, everyone!

It's Friday, so it is my day to post for the ScrapTownLady Blog! Since some of you have asked for it, I'm showing some more creations in the clean and simple catagory.


Sponged with a few blues here, hoping to give the impression of water and sky! Used my Perfect Layers Rulers to get the mats so neat and clean (see sidebar for details).

Here's what I did:

1. Sponge some distress inks on three focal panels.
2. Stamp image and sentiment on each panel.
3. Trim panels to desired size, and touch up the cut edges with distress ink.
4. Mat with black cardstock from scrap pile.
5. Adhere panel to piece of patterned paper, cut to 5.75" x 5.75".
6. Adhere finished panel to 6" x 6" card base.

Voila! You have three cards in 30 minutes!

Hope you like them - thanks for stopping by today!

Hope you will follow the ScrapTownLady blog, so you don't miss a thing - there is daily inspiration for all levels of papercrafters!


Designer Tip: When using a solid die, such as this Circle Shaker Die, it's difficult to know what will fit within each piece. Using a scrap piece of cardstock, cut a sample to store with the die. It's easy-peasy to pull those pieces out, and test them with your images before cutting that precious, hoarded piece of cardstock!
I gently sponged each of the pieces, to give you an idea of how many shapes you get from one single pass through your die cutting machine!  You can find this die in both circle and square at Scraptownlady!


Hugs and smiles, Patti J.

Friday, August 9, 2013

Bling....Bling....

Happy Friday!
It's my day to post at the ScrapTownLady Blog, and I have a cute project to share.  Hope you like it!


A year or so ago, while I was shopping, this very gaudy, very blingish frame was free with purchase at a ladies clothing store.  I tried to tell the sales clerk that I didn't need it, but she insisted that it was free, and that it was going home with me.  It did, and it has been in its own little spot on a shelf in my girl cave since then.  When Cheryl got thes fabulous Prima Doll stamps in, I knew that I'd found a great use for this frame!

The Prima beauty was stamped on white cardstock, and stamped again, on several sheets of designer papers (listed below).  I then cut out sections from the designer papers, and pieced my original stamped image.  Paper Piecing is one of my favorite techniques, and just seems so perfect for these ladies.  After coloring the crown and belt, I added a bit of sparkle with a glitter pen for some additional bling. The sentiment (Flourishes) was stamped and matted, using my Perfect Layers Tools (see sidebar for details), and another piece of designer paper was fussy cut, and added to the bottom right corner for a bit of pizazz!

Thanks so much for stopping by!  Be sure to check out the ScrapTownLady store, and pick out your own Prima Girl to create with!

Have a great weekend,

Patti J.

ScrapTownLady Supplies:
Prima Julie Nutting Doll with Strapless Dress
Flourishes Stamps 'Sweet Days of Summer'
KaiserCraft Lavendar Haze 6.5" x 6.5" Paper Pad
KaiserCraft Chapter One 6.5" x 6.5" Paper Pad
ZVA Creative, Pink Flourish
EZ Runner Permant Adhesive
Glue Dots Mini

KaiserCraft 'Sweet Nothings', 'You & Me' (no longer in stock)


Other Supplies:
Frame
Copic Markers 
Perfect Layers Rulers (see sidebar for details!)

Thursday, August 1, 2013

Card & Sketch-abilities!

Happy 1st day of August!  It's Thursday, and my day to post for the ScrapTownLady Blog

We are so excited that The ScrapTownLady blog is sponsoring our friends over at Sketchabilities and Cardabilities for the August 30th reveal!
What does that mean for you?  Not only fabulous inspiration with the amazing sketches that they have to offer for Scrappers and Card Makers, but also two opportunities to win a very generous gift certificate to the ScrapTown Lady store in the amount of $50. 

That's right, two gift certificates are up for grabs, so be sure you enter for your chance at a really fun shopping spree! You will find the entry forms over on the right sidebar of the ScrapTownLady blog, for both.
Here are my projects for the reveal:

Sketchabilities Sketch #96:
Above is my layout.  I am so NOT a scrapbooker, so this layout was WAY outside my box!  Giggles allowed!

Cardabilities Sketch #80:
Here is my card.  Of course, being the rebel that I am, I just 'had' to flip things up a bit!

Thanks so much for stopping by today!  Be sure that you play along with these amazing sketches, over at Sketchabilities or Cardabilities!

ScrapTownLadySupplies:
Layout:
Impression Obsession Leafy Branch Die
My Mind's Eye Lost & Found 3 Collection
Want2Scrap Creme Pearls
Petaloo Chantilly Collection Flowers
La-La Land Crafts Summer Marci 
Scotch Quick Dry Adhesive
EZ Runner Adhesive
Other Supplies: Copic Markers, Memento Tuxedo Black Ink

Card:
KaiserCraft Chapter One 6.5 x 6.5 Paper Pad
KaiserCraft Cardstock
Flourishes 'Sweet Days of Summer' Stamps
Tim Holtz Broken China, Crushed Olive, Peeled Paint Distress Inks
Petaloo Chantilly Collection Flowers
May Arts Ribbon
Want2Scrap LaCreme Pearls

Scotch Quick Dry Adhesive
EZ Runner Adhesive
Other Supplies: Versafine Black Ink


One last thing....one day last week, I posted these Prima Doll Tags on my blog.  Did you know that you can buy lots of Prima dolls at ScrapTownLady?  She has the dolls, the tags, even the stamp that was used to embellish the red dress on my 1st tag!  Check them out, HERE, and HERE!


Hugs and smiles!
Patti J.

Thursday, July 11, 2013

Thinking of you...

Good morning!  Today is my day to post for the ScrapTownLady Blog. I can't believe what a great variety of stamps she carries in the ScrapTownLady store!  I chose to work with this fun Stampendous image today. Just thought something a bit 'girly' seemed like a good plan.


This image was so much fun to create with. I wish you could see it in real life.  There's a touch of sparkle, lots of gloss, and a nice, rich color.  The color was painted on, using Tim Holtz Distress Inks, and a water brush.  Reminded me of being a kid, and playing with my watercolors!  Painting was great therapy, too, as it's been a week of sadness, having lost a friend to cancer. KaiserCraft makes such gorgeous papers, and it was fun searching for just the right combination - it needed to look elegant, a bit vintage, and even a little sassy!  Used my Perfect Layers Rulers for that beautiful 1/8" white border (see sidebar for details). Hope you will head over to the store, and purchase this stamp yourself.  Can't wait to see your creations!

ScrapTownLady Supplies:
KaiserCraft 6.5 x 6.5 'Lavendar Haze' Paper Pad
Impression Obsession Stamps (sentiment) 'Hydrangea Set'
Stampendous Stamps 'Cling Rose Corset'
Prima Flowers 'Pixie Vine Fairy Belle'
Tim Holtz Distress Ink 'Tattered Rose & 'Bundled Sage'
E-Z Runner Adhesive
Scrapbook Adhesive 3-D Foam Adhesive
Ranger Inkessentials Glossy Accents

Other Supplies:
Black & White Cardstock
Perfect Layers Rulers
Kuretake Wink of Stella 'clear'

Designer's Tip:  If you are using a stamp that is larger than any acrylic blocks that you have, grab one of your Cuttlebug Plates!  The stamp will stick to it perfectly, it will wipe clean, and you won't have to invest in a larger block!  

Thanks for stopping by today!

Have a great day,
Patti J.

Thursday, July 4, 2013

Hello!

Hello!

Today is my day to post for ScrapTownLady's blog, and I have a couple of cards to share.  As today is Independence Day in the U.S.A., it felt right to use more of the beautiful red, white, and blue papers found in the ScrapTownLady Store.  This card is sort of a 'half' easel card.


To make this card, simply create your card - this is an A2 card, but any size works.  Score your card front at the halfway point, and fold downwards.  Ta Da!

This photo is looking down on the card, so that you can see the "Pride" sticker that holds the easel in place.
 It was fun to use the I-O grass die for the appearance of 'fireworks' in the background!
Here you can see that the entire top half is blank for your own personal message.

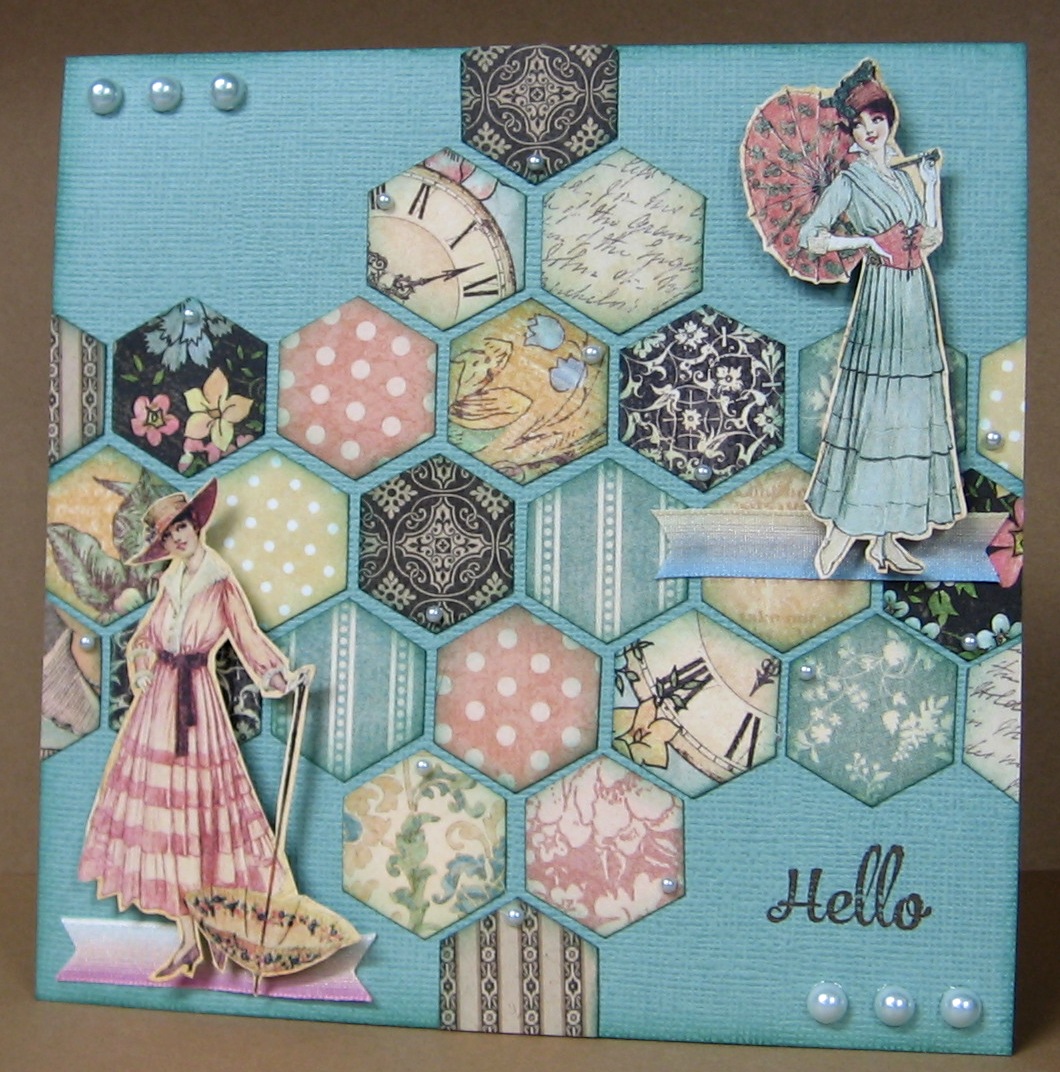
The next card was fun.  I've so badly wanted to create with some of the Graphic 45 papers that Cheryl sent me, but couldn't choose which piece to use....so I used nearly all of them!
 
 
Hexagon dies are not something I own, so I dug around, and found this old plastic template.  As it has M's on it, it probably belonged to our daughter, when she was in grade school!  Guess it pays to be a hoarder (grin).

The next step was to cut the hexagons out, distress with some Pine Needles Ink on a sponge dauber, and make a fun layout with them.  Last, a scrap of ribbon for each fussy cut lady, a few pearls, and a stamped sentiment completed this quick and easy creation!

Hope that you've all had a great week, and have a wonderful, safe day today!

ScrapTownLady 'Sweet Land of Liberty' Supplies:
Authentique "Pride" DP Collection
Authentique "Pride" Components (Sticker)
Impression Obsession 'Circle Shaker' Die
Impressions Obsession 'Sweet Land of Liberty' Stamp
Impression Obsession 'Grass Border' Die
Impression Obsession 'Spiral Daisy' Die
Want2Scrap Red Pearls
E-Z Runner Adhesive
Scotch Quick-Dry Adhesive
May Arts Navy 5/8" Ribbon

Other supplies:  Amuse CS

ScrapTownLady "Hello" Supplies:
Kaiser Craft 'Frost' Cardstock
Kaiser Craft Pearls 'Bliss'
Impression Obsession Stamp 'Hydrangea' Set
Tim Holtz Distress Ink 'Pine Needles'
Graphic 45 'A Ladies Diary' Collection
Jumbo Dauber

C'est Jolie Ruban Variation Ribbon
Other supplies: Versafine Brown Ink


Happy 4th of July to you all!

Thanks for stopping by,

Patti J.