Showing posts with label gifts. Show all posts

Tuesday, October 29, 2019

Mix and Match at Blue Knight Rubber Stamps - Anything But a Card...

Hello, my creative friends!

I'm pleased to share my last Blue Knight Rubber Stamps project with you today.

I've really enjoyed working with this team, and using the Blue Knight products. It's always sad to see a guest design spot come to a close! Thank you Michelle, Lynn, and everyone who made me feel welcome!

Again, the October theme is Mix 'n Match - we are to use one or more stamps from at least two stamp sets, and today's project assignment is 'Anything But a Card'!

I made this little gift for someone special, who came into my life when I didn't even know I needed her!  I hope it brings a smile to her day.  

The images were stamped with Memento Tuxedo Black Ink, and colored with a handful of Copic Markers. I used these Blue Knight Rubber Stamps products:


Hope you like it, and are inspired to check out the blog (link below) for more inspiration from the design team!

Visit Blue Knight here:


Thanks so much for stopping by today!

Hugs and blessings,
Patti J.

Friday, June 15, 2018

Scor-Pal Mid Month Tutorial

It's already mid-June!  Where did this month go?

It's my turn to share a mid-month tutorial with you.
I had seen something like this done on Pinterest with jelly jars, and thought it would be fun to adapt measurements for some pretty little candles that I found at Wal-Mart for about $1 each.

Let's get started on this quick and easy gift idea!

Gather up your Scor-Pal, scissors, and Scor-Tape.


Cut 3 pieces of cardstock. I used a glitter pink because I liked the sparkle!
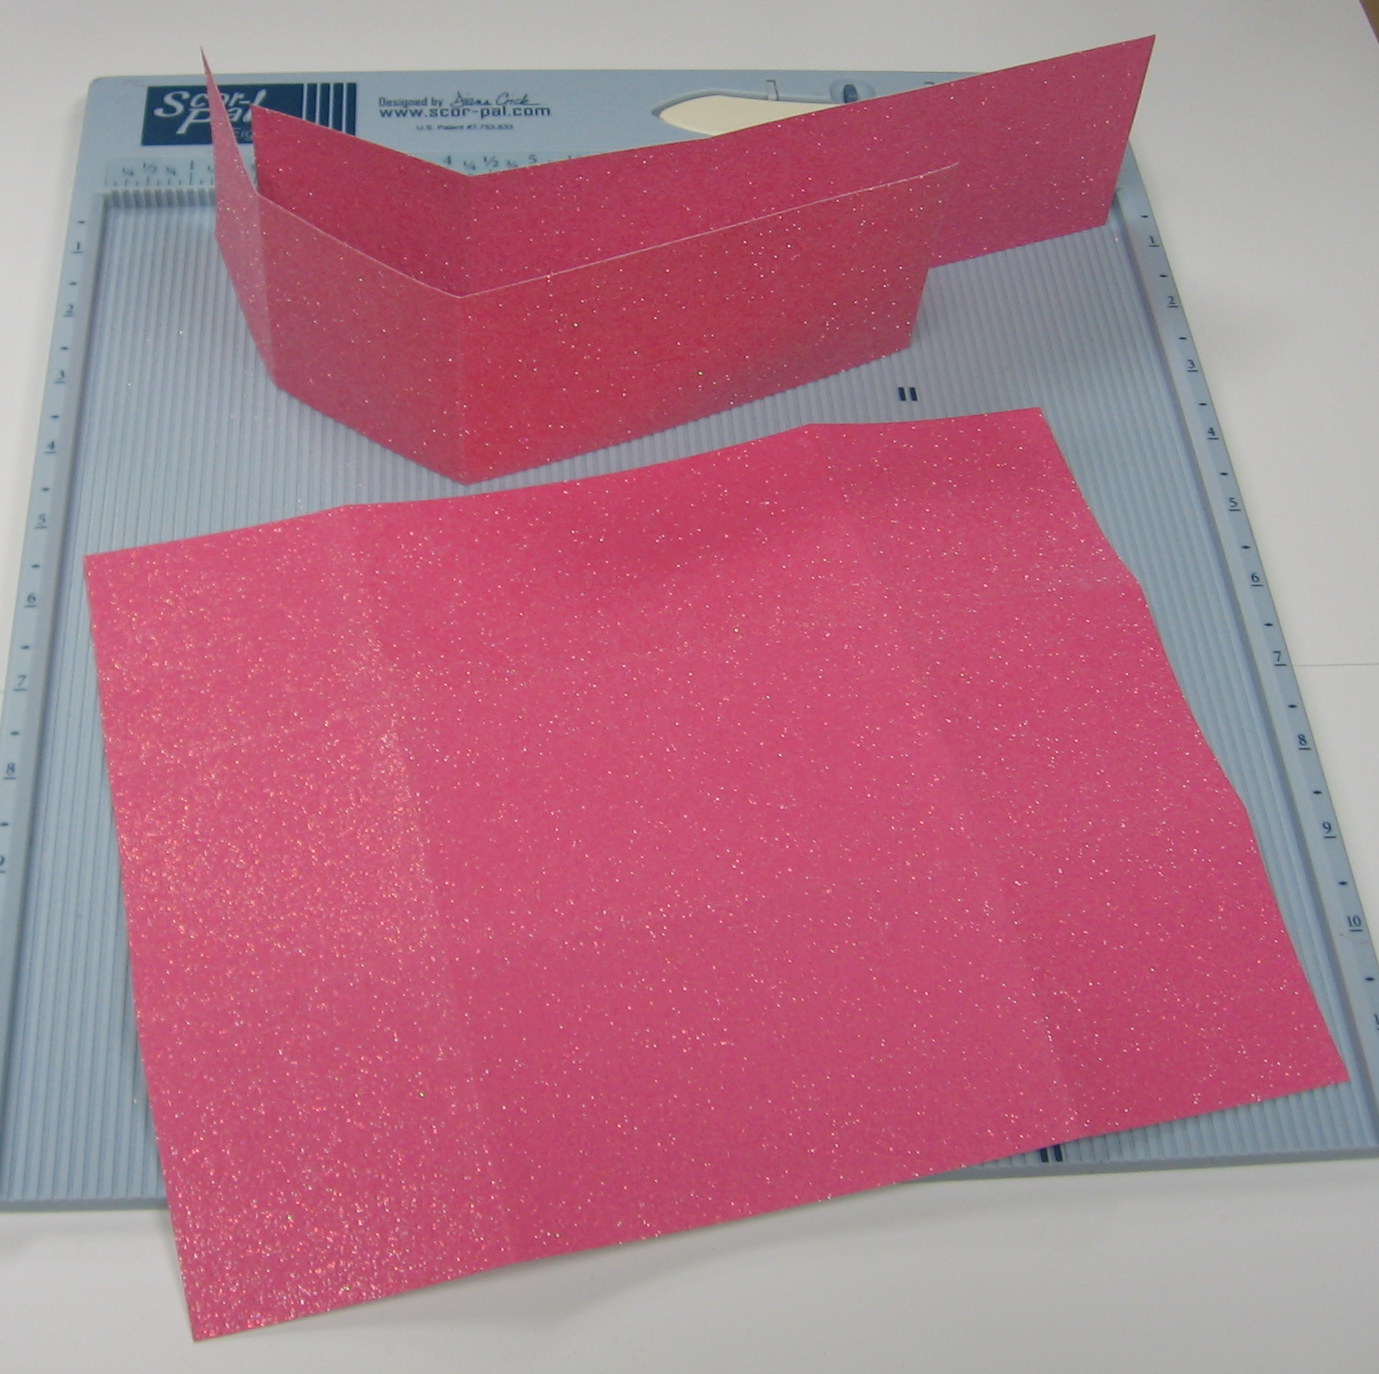
Cut 2 pieces at: 10.25" x 2.75"
Cut one piece at: 8.25" x 10.5" - Score the long side at 2.75" and 7.75".
Score the short side at 2.75" and 5.5".


Cut in to the fold lines on both of the long sides, and snip the two outer 'tabs' just a bit for easy alignment.

Turn your cardstock over, and apply Scor-Tape to the tabs.

Remove tape liner - fold and adhere tabs to inside to create box.

Your two smaller pieces will look like this after they are scored.

 Flip them over, and apply tape.

Carefully adhere the two pieces, wrong sides together ONLY ON THE SECTIONS WITHOUT SCORE LINES, and using a punch or die of your choice, create a 'handle' opening.
Now, fold your two remaining flaps (each with two score lines) out to create a T.
Remove tape liner, and gently position the bottom of the T into the bottom of the box.
Remove the tape liner from the sides of the T and adhere them to the sides of the box.

Here is what your finished box looks like.

Add your candles, decorate your box as desired, and...

Voila!  A fun little gift package for someone special!

Thanks for stopping by today!

Give this tutorial a try or pick another project.  If you are low on ideas or are looking for inspiration, be sure to check out the Projects on the Scor-Pal website or our Pinterest board. 

Patti J.

Friday, December 19, 2014

Incredibly blessed!

Hi ya'll...

So, have you ever just felt incredibly blessed by this hobby papercrafting fun addiction of ours?
Well Tuesday was one of those blessings days for me - let me tell you about it!

We pick up our mail at the Post Office in town.  Every. Day. Every. Day. Ho hum,
especially this time of year, when the lines are out the door, and down the steps!
It's about a five mile drive, and by the time I get there, I'm usually thinking of the 1001 things 
I need to be doing!  So....by the time I actually get my mail, I'm working on a tiny bit of grumpy.

Well........Tuesday was so NOT a grumpy mailbox day!  

Let me show you what was in there!

First, a padded envelope.  Nope - not showing you that....lol.

When I opened the envelope, this absolutely adorable tag was inside...


Those of you that know me, know how much I love me a cute snowman, and this
sweet feller even has googly eyes!  Be still my heart!

The note on the back of the tag was so very sweet.  I actually teared up.

Under the tag (which was gift enough!) was this sweet envelope (and just look at the
teensy tiny Patti tag!!!!!):


Inside the pretty black envelope were these beautiful doilies - look at the colors...OH MY GOODNESS!  I cannot wait to glue them to something :)


To my online friend, Taunya, a huge thank you!  You are one of the sweetest
bloggers that I've every had the pleasure to visit with, and I'm so grateful
that our paths have crossed!  To all of you out there in Blogland, if you have
never checked out Taunya's blog, you should!  She is so generous, and has such a 
creative mind - I'm inspired each time I go.  

Thanks for letting me share my happy mail with you!

Hugs to all,
Patti J.

Tuesday, October 15, 2013

Creations by AR Harvest Pumpkin

Good Morning, and welcome to the Creations by AR New Release Blog Hop!
Today, the AR ladies are sharing Adela's beautiful new template, 'Harvest Pumpkin Set'.
I think that these turned out so well - can't you just imagine one at each place setting for Thanksgiving Dinner?

Here is Pumpkin #1

And Pumpkin #2

Here is what they look like with their tops off, filled with candy corn.


There is also a beautiful card in this set!  You get the pumpkin template, the leaves, the flourish, and the card!
What a great set for your collection!  As always, this set comes in PDF, SVG, and DXF files.

I am so grateful to my friend, and teamie, Sue Kment.  As you know, I normally use the PDF files, and cut the pieces with scissors.  However, this month, Sue graciously cut my pieces out while cutting her own, and mailed them to me.  You see, I'm in the midst of helping DH put a roof on the house, painting shutters, doors, etc., AND creating for a baby shower!  Time this month was a real issue, and Sue saved me! Thank you, dear friend!!!

So, how can YOU win this template?
Leave a comment on each blog (see below!)
Comment on the AR Facebook Page
Comment on the Papercraft Planet Group

Comments will be accepted until October 20 (12:00 noon EST)
One random winner will be announced on October 21st on the AR blog, the AR Facebook Page, and the AR Papercraft Planet Group.

Time to hop on!!!  You won't want to miss the other lovely creations today!!!

Adela     Lisa     Jak     Julia      Lyn     Sue K.    Lori

Thanks for stopping by,

Hugs & blessings,
Patti J.

Wednesday, May 8, 2013

Creations by AR - SOSN...Winter Mitten Set


Welcome to Creations by AR, Something Old...
...Something New!
 I love taking an older template, and totally changing up the theme!

Couldn't resist 'tilting' the large mitten just enough that the words 'Pudding in the Mix' were visible.

For this project, the Winter Mittens Set is being used.  
However, instead of a mitten, I've created an oven mitt, complete with a cake mix, frosting, and some cupcake liners.  This will make a fun last-minute gift for someone special, don't you think?
Here, I have enlarged and printed the mitten to be large enough to 'hide' the cake box.

Using the Pillow Top Technique (found on Stamp TV), some ink, and a sponge dauber,
lines were sponged, in two directions, giving the cardstock a quilted, fabric look.  In real life,
you just want to reach out and touch to be sure it's really paper!
In this photo, you can see that the frosting container has been 'hidden' under pretty papers and trims, and the mitten template has been reduced, cut on the fold, and used to create a gift tag.

You can find the Winter Mittens Set HERE. This set has three mitten templates: a mitten shaped Card, a mini Ornament, & a gift card Pouch.  The card even comes with a cutout for framing a photo or sentiment!
Creations by AR's templates come in SVG, DXF, and PDF files.
As I have no cutting machine, my projects always use the PDF files and my trusty scissors!

Thanks for stopping by today,
Patti J.


On a personal note...
Dear daughter and her amazing hubby, and of course, our sweet grand-doggie boarded their plane for Germany late last night.  We will miss them, but are so happy for the wonderful adventures that we know they will share over the next three years.
And...we applied today, for our passports!

Thanks to all of you for your thoughtful emails and cards, as we face this separation from them. 

Melissa has previously lived out of country for a year, so we know we will get through this, but your kindness has been overwhelming.  Thank you for being such great friends!!!

Monday, December 10, 2012

Christmas Days with Creations by AR - Day 5

Christmas Days!
(To see my Repeat Impressions Stamp of the Week Post, please scroll down)

For 10 days, that began on Thursday, December 6th, the AR Girls will be sharing ideas for presenting holiday gifts using templates from Creations by AR! Not only will you get to know each of the AR Girls, but every day for 10 days they will bring inspiration to you with their holiday projects. So, join us daily at the Creations by AR FaceBook Page or at our AR Group on Paper Craft Planet.


 Welcome to Day 5 of the hop!
I am pleased today to be showcasing one of my favorite Creations by AR templates, the Gift and Card Combo.

Here are all three of my creations.

Rubber Stampede Image, Tim Holtz Distress Ink, Bazzill DP, Ribbon from my stash.
Northwoods Rubber Stamp, Cardstock, Transparency from Office Max
Amuse Candy Cane CS, Stamping Bella 'Frostier' KS207, Copic Markers, Paper Piecing with Bazzill CS, Happy Winter stamp is Paper Salon  


I fully intended to fill this box with tags, but ran out of time!  So it's filled with ugly M & M's.  The sentiment is by Penny Black "3274H Once a Year", and reads "At Christmas play and have good cheer, for Christmas comes but once a year!"
Stampendous "JO89 Friends Love, "C037 Snow Angel", Bazzill DP, Copic Markers, Sakura Glitter Pen, Amuse Baker's Twine, Black Colorbok CS, White Office Max CS
Each of these adorable gift boxes has an adorable slide out drawer, for candy, tags, gift cards, jewelry, ornaments, Copic Markers, etc!  This sentiment is from Impression Obsession "Peaceful Season Wishes #D8623"


One winner each day will receive a template of their choice from Creations by AR. The Daily Prize winner will be chosen from comments left on the designer's blog who is featured that day.  The daily winner will be announced the following day on the AR FaceBook Page and on our AR Group on Paper Craft Planet 

The Grand Prize Winner will receive ONE TEMPLATE A MONTH FOR SIX MONTHS beginning January 2013! The Grand Prize Winner will be randomly chosen from comments left on the  AR FaceBook Page and on our AR Group on PCP between December 6-15. Winner will be announced December 16.

* * *
Day 4 was Julia be sure to pop over and see what she made I know it was amazing.
Day 6 will be Lori, and she has a special treat ready to show you so remember to pop over tomorrow.
Thank you so much for stopping by and I hope your holiday season is wonderful!
Patti J.

Thursday, October 25, 2012

What Have I Been Up To?

Howdy!
So, I'm back on my feet, but haven't been here much this week.  "What have I been up to?", you ask...
I've been busy, busy busy, watching videos from many of you fabulous crafters!
...Trying to get some ideas for creating a set of tile coasters.


No, I realize this is not tile coasters.  I've also been playing with Gelato's!
A few weeks ago, my wonderful friend, Dawn, knew I was looking for some to experiment with, and sent me a couple to try.  What fun!  I had seen a video by Penny Black & Jill Foster, (PBJ) where they used Gelato's on a gorgeous wooden bird, and when I saw this deer at Michael's this summer, I had to have it.
 Thanks, Dawn - you rock!

Used two shades of blue Gelato's and one silver.  Embossed with white Stampendous EP, using Gina K. Designs "The Magic of Christmas" snowflakes.  Rubbed Gelato's onto wooden deer (Michael's) using my fingers. What fun!!!

NOW.....on to the tiles!
I have this beautiful stamp set "Quiet Waters" from Our Daily Bread Designs, and thought that it would make a lovely set of tile coasters.  Again, watching a PBJ Video, I learned that I could stamp on them with my Staz-On, and color them with Copic Markers.  Yup, you heard that right!  After heat setting them with my heat gun for a good long while, I dunked them, soaked them, washed them, scrubbed them, wiped them with a towel, etc., and the color didn't even budge.  To be safe, I did put a coat of spray sealer on each tile.  Hopefully, it will be permanent.

My photos really have a red glow to them - so sorry!  They are a pretty rich brown in real life...


I made a set of four, glued on some felt pads, and was so lucky to have a wonderful friend, Shirley, whose wonderful DH is a master wood worker.  He just 'happened' to have a 'Coaster Holder' all made up that fit my coasters perfectly!  He makes racks for Stickles, holders for heat guns, coaster racks, bow-maker's, etc...

What a fun gift this will be.  They are going in the mail tomorrow morning to someone very very special!  Hope he likes them :)

Okay, dear friends - that's what I've been up to!  Now, I must go create for some DT deadlines - if I don't, I might just get fired...

Thanks for dropping by!

Hugs and blessings,
Patti J.

Monday, October 22, 2012

Fall fun....

Hello, and Happy Monday!
I have a bit of 'fall fun' to share with you today.


First up is a card that I made for a challenge at The Outlawz.  
The CAS Challenge this week is to use limited fall colors.  
We were to choose 3 colors to use, from Red, Brown, Yellow, Green, and Orange.

Hero Arts: #K5574 Big Eyes, Amuse Ink: French Roast, Kaliedacolor Ink: used only orange, sorta blended the brown and orange for the leaves.

I used Brown, Orange, and Yellow for my card.
I sponged on the yellow, orange, and finally brown inks, directly onto the stamp, then turned the stamp over and stamped directly onto patterned paper from last year's DCWV Autumn Mat Stack Pad.
Using a Spellbinder's die, I cut out and embossed the owl, adhered it to my card front, and used a brown Sharpie marker to 'stitch' around the edges.

Looking at this on the screen, I think I will 'stitch' around this too - looks a bit bare :)

For the inside, I used the piece of DP that the owl was cut from, and just put some white CS behind it.

Now, onto project(s) two through thirty!


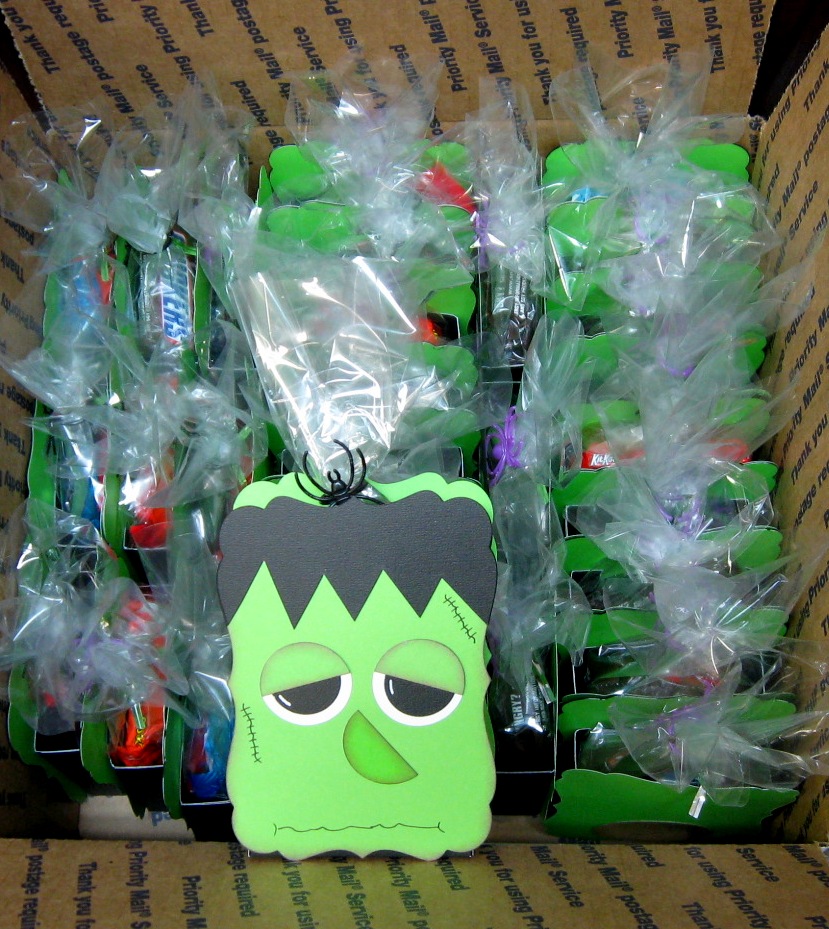
A couple of years ago, I had seen a Frankenstien like this on-line someplace.  I don't know if it was someone's blog, SCS, or in a magazine, but I sketched out the basics and stuck it in my notebook. So, I sincerely apologize for not being able to give rightful credit!  If you are the original creator of this cutie patootie, let me know, and I will edit this post immediately!


Anyway, I created thirty of these to send to my DD's workplace. Hopefully, they will brighten up the office for a day or two.  What's fun is that their office is so cool - their color is this bright green!  So Frankie will fit in just perfectly.


Hope your week is a good one! It's a beautiful, fall day, here in Missouri!
Thanks for stopping by,
Patti J.

Saturday, December 18, 2010

Soup, anyone?

Hello out there!
It's very quiet in blogland today - hope that means you are all finishing up some shopping, baking, wrapping, etc.!
I'm getting closer (thank heavens for on-line shopping!)...

I had an order this week for something very quick for some staff mailboxes.
Of course, being iced in, I didn't have 30 matching anythings to hold items.
After a bit of thought, here is what I came up with!
The ingredients.....
30 somewhat matched packages of Snowman Soup...
The front...


The back...


Using envelopes, I sealed them, cut off one end with a scallopped cutter blade, and used up a LOT of Christmas scraps!
The cute little snowman is by Stampendous, and I reach for him a lot!
Coloring is with Tombows and a glitter pen.
The little 'stir sticks' came from our Aldi store.
The rest is computer generated!
I can't remember where I got either saying.
The one ON the inside came from someplace on SCS, I believe.
If it is your design, let me know, and I will certainly give you the credit
and the thanks for a great idea!!!


All righty, thanks for stopping by! I'm off to bake some cookies!


Hugs and smiles - Patti J.

Saturday, November 20, 2010

What I did when I should have been cleaning...

Oh dear...it's the Saturday before Thanksgiving, and guess what I did today?

I played in my girl cave.
And I liked it!


lol...


This first project is actually one that I made when my friend Shirley came over to create with me a couple of weeks ago. We each provided a project, and this was hers. You can find the template in the resource tab at Splitcoast Stampers. This is just so much fun! These fancy file folders are from Office Max. One file folder, one Jr. legal pad, one RSVP pen, and Voila! I topped my left pocket off with chocolate...


I am entering this notebook at A Crafty Little Place, where the challenge is 'Alter It'.


Since I plan to use this as a Christmas to-do, holiday list book, I am also entering it at: Our Creative Corner. The challenge there is: 'Holiday 3-D Project'.


This next card was made for these challenges:

Incy Wincy Designs: Anything Musical

Basic Grey Challenges: #33 Wings (angel, Basic Grey Jovial DP)

ABC Challenge: H is for Holidays


Noel makes a darling gift card holder!

I'm entering this at:

All That Scraps: Gift Card Holder (must use a stamp that ATS carries in their store)


Next is some more of the new Basic Grey collection - isn't it gorgeous? I am entering this card here:

Just Us Girls Challenge: Color challenge - Yellow, Dark Red, Black, and White

One Stop Craft Challenges: #107 Snowpeople

Freshly Brewed Designs: Show your style


Hope that YOU are having a good Saturday too! I'm thinking that I should go fix some supper! Thanks for stopping by to look! I'll get by your blogs this evening!
Take care - Hugs and Blessings!
Patti J.