Good morning!
I had some folks comment, and emailme, asking how to create the butterfly card that I posted yesterday, so I decided to make another card, taking photos along the way. I apologize for the photos. Should have put something under the project pieces, so that the lights above wouldn't reflect.
1. Create a card base,
a darker colored mat (a shade smaller than the card base),
and a focal panel (a shade smaller than the mat).

2. On separate scraps of white cardstock, stamp and color your image. As you can see, I was very messy! No worries about staying in the lines :)

3. Fussy cut your image.

4. Stamp sentiment, and adhere your stamped images, wherever you like.

5. Trim the images, where they overhang the sides of your focal panel.

6. Place focal panel inside embossing folder. I chose the Stampin' Up! Square Lattice, as it's a tight, woven pattern. My goal was for the panel to look a bit like fabric.
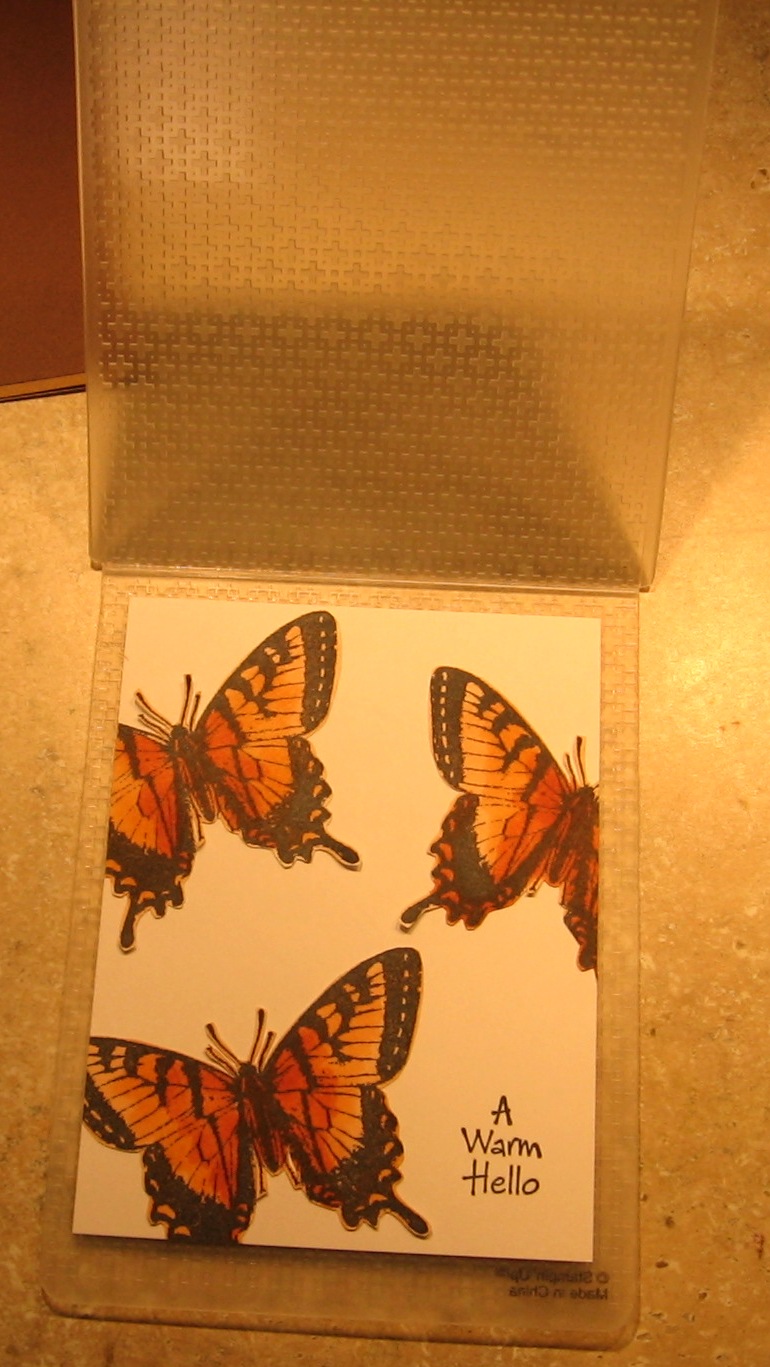
7. Close folder, and run through your embossing machine.

8. Open folder, and say "OOOOH.....AAAAAHHHHH...."!

9. Adhere panel to mat. Voila!

Now, if you are not a coloring addict, like I am, you could do this very same technique, using ready made images, punched shapes, etc.!!! Possibilities are endless.
Thanks for stopping by! Again, I apologize for the yellow pics, but I think you get the idea!
Feel free to email me, or leave your email in a comment, if you have questions. I'll get right back to you!
Hugs,
Patti J.
Butterfly image is Gina K. Designs, and sentiment is Hero Arts.
22 comments:
Great tutorial, PJ..... I love this technique!
Love your card, Patti! Thanks for taking the time to photograph each step. It really rocks!
:) Marie
This is beautiful! Thanks for the tutorial. Pics are fine!
Great tutorial - but....I liked the one IRL!!! LOL - I made up 3 more of these last pm - beautiful cards.
Great tutorial! Beautiful card. I love the results a lot!
I would be cringing when it came time to cut those beautiful butterflies but might try it anyway!!
awesome, thanks for sharing!!
Great tutorial! I just love the finished product and that embossing folder really did achieve that fabric look you were after.
This is GORGEOUS, Patti! Thanks so much for the tutorial. I am definitely going to give it a try.
Perfect tutorial. My DGD likes doing the inlaid technique with punch pieces but I prefer the colored images :)
Thanks for the tutorial! You are always so creative...
Thanks so much for taking time too show us and explain step by step this technique.It is beautiful and the embossing folder goes so well with it.
Wow Patti what a fabulous tutorial, thanks for sharing...such a creative and gorgeous design!!!! Love it
Super fabuloust technique and contrats...I saw it published. I also used it on a card and gave you a shout out on my blog. Hugs, GF.
WOW, this is an awesome technique I will be trying. Saw it on Cheri's blog. Thanks!
Roxann
Just became your newest follower!
What an effective technique, that one will definitely get tried out very soon!
THanks for sharing!
xx
Laurian
I missed yesterday's post, but this card is gorgeous! I will have to check out the other card you made now.
Beautiful card, thanks for the tut, great job. Love this idea, thanks for sharing.
Hugs
Sue
Wonderful tutorial, love the butterflies!
hugs
glenda
Beautiful! Love the gorgeous butterflies and the texture! Great tutorial.
I'm finally catching up on blogposts that went live while we were traveling. This butterfly card is lovely and your tutorial was perfect!
Post a Comment