Hey there!
Can you believe it's already Monday?
Today, I will share how easy it is to make a card with a split front. These always draw
lots of oooh's and aaah's, and look far more difficult and labor intensive than they really are.
I know that you'll want to make one and I can't wait to see it!!!
First you will need an A2 card base. I cut mine at 4.25" x 11".
Since I'm making more than one card, you will see two of everything :)
Score your cardstock at 5.5"
Burnish your score lines.
Decide which will be your bottom front of card. Cut 1.25" off and set aside.
Cut another 1.25" off.
This is what you should have.
You will only need one of the 1.25" white strips. You can either discard the second one,
or if you're a hoarder like me, you can save it for another project!
Now you will need some layers. You will need:
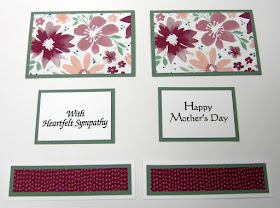
one piece of designer paper that measures 3.75" x 2.25"
one piece of designer paper that measures .75" x 3.75"
one piece of 'matting' cardstock that measures 4" x 2.5"
one piece of 'matting' cardstock that measures 1" x 4"
one piece of matting cardstock that measures 2" x 2.75"*
one piece of white cardstock that measures 1.75" x 2.5"*
*depending on your sentiment or image the last two pieces may vary in size from my card.
These are the layers that you will have (these are not yet assembled - I've just laid them out for you to see)
Stamp your image or sentiment on your white panel. Lucky for me, there is this really fabulous
white cardstock that I use, which enables me to turn my piece over and try again in the event
of a mis-stamp!
Now, just begin assembling all of your layers.
Top of card
Here, you will place your white strip at the bottom of your card, being careful to line it up with your bottom edge of the card back. It's a bit odd having that open area between your panels. I find that it helps me line things up if I use some post it scraps to hold things in place!
Once things are lined up, apply a strip of adhesive to only the top and bottom edges of your focal panel, center, and adhere to the top and bottom panels. Pretty cool, right?
Embellish as desired. I've used butterflies, and cut out a flower from the designer paper
for these two cards. A few little pearls finished these off nicely.
For this card, I turned the sentiment the opposite direction, and embellished with
smaller butterflies and some tiny gemstones.
Hope you give this a try!
If you do, be sure to let me know - I'd love to see your beautiful creations!
Thanks for stopping by today,
Patti J.


