Good morning!
I'm here today with a Pinspired project for the Scor-Pal blog. The Scor-Pal Design Team each take a month, and we find a project on Pinterest that inspires us to create!
This month, I'm your hostess, and I have been 'Pinspired' by this project by Sandra Ronald.
I made a whole lot of these for some special ladies at church!
Here are my boxes:
And here is how these were made!
(Be sure to check out Sandra's video tutorial!)
Cut your card stock to 9" x 6 1/4"
Score on the short side at 1/2", 1 3/4", 5"
I used my Scor-Pal Eighths (which I dearly love) to score my boxes.
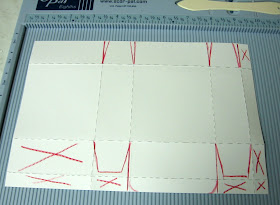
(The dotted lines were drawn on, so you could see the scored lines)
(The dotted lines were drawn on, so you could see the scored lines)
Score the long side at 3", 4 1/4", 7 1/4" and 8 1/2"
Burnish all score lines
Cut as shown below. The boxes with X's will be cut out entirely.
Round the corners on what will be your 'top flap'.
When it's cut out, it will look like this. Add some adhesive to your skinny tab on the side.
Of course, I used Scor-Tape 1/4" for this!
Flip your card stock over, and apply adhesive as shown.
Fold and create your box as shown.
OOPS! You should do this step BEFORE adhering box together!
Using a small circle punch, create a little half circle, to allow you to open
the box with your thumb or finger. Mine was a wee bit tricky to do, as
I did it after the box was assembled...
Finish your box, and decorate as desired!
Remember, your box won't have all of the creative pencil marks on it - I just used them so you could better see the scoring lines.
That's it! I made all of these boxes in one evening, and you can too!
Thanks to Sandra for some great 'Pinspiration'!
I hope you'll give this box a try. Don't forget, you still have time to enter the October challenge at Scor-Pal - 'More than one fold, with a Fall/Halloween/Harvest Theme!
Thanks for stopping by,
Patti J.


Those church ladies will be so happy they know you. They will love these fabulous treat filled boxes.
ReplyDeleteI saw this on the blog and I wanted to be sure to stop by and tell you how adorable these boxes are! I think it's perfect for just a little treat for someone! Thanks for sharing your tutorial and hopefully I can find some time to make one soon! HUGS :)
ReplyDeleteWhat a kind lady you are to go through all that work to make treat boxes for the ladies at church. How delighted they will be to receive them. They are just so darn cute. Great inspiration.
ReplyDeleteThese are fabulous!!! Just beautiful!!!!
ReplyDeleteOh wow, these are fab Patti, I can't believe you made them in one evening - they look amazing! Your ladies will love them :)
ReplyDeleteThese are just charming and will be a nice keepsake once the candy is gone!
ReplyDeleteHello queen of box making - so good to see you creating "again" in your new craft room. I like the one with the peanut butter cups but I know the church ladies will love the tea boxes. Great tutorial.
ReplyDeleteWOW, I guess you did, and are they ever going to enjoy these special little treat boxes! Thanks for sharing the instructions, you are the box queen for sure!
ReplyDeleteHugs
Sue
These are so cute and creative, my friend! Everyone will love them.
ReplyDeleteThis project is fantastic, Patti, and your tutorial is so easy to follow. Thank you so much for sharing your creativity with all of us.
ReplyDeleteWhat beautiful treat boxes, Patti. You're the Scor-Pal queen :-) Love the papers and colours you used. And of course the treats! :-)
ReplyDeleteHugs,
Lena