Hi there, crafty friends!
It's my day to bring you a Project of the Week on the Repeat Impressions Blog,
Today, I've chosen to CASE (copy and steal everything) a card from the talented Stampin' Up!
folks. I'm not sure exactly where this card originated, but there are directions for this
Pop Out Swing Card on Pinterest.
I've used the beautiful Repeat Impressions #5127-K Maple Leaf (sil) for my card.
First, create your A2 card base. For my card, I chose a fall-ish
patterned paper. Score your card base.
Next, look through all of your awesome Repeat Impression Stamps,
and decide on your focal image.
Stamp your image - I used a Kaleidacolor pad, and sort of turned it as
I stamped, to create a blend of colors.
Fussy cut your image (or stamp directly onto your focal panel if you prefer).
Cut your focal panel and mat to your desired size.
My panel ended up being 3" square, and my mat is 3.25" square.
Here is my finished focal piece;
Set this piece aside for a few minutes while you work on your card base.
If you have a die that will work, you can use one here.
I did not, so I merely drew out where I wanted an opening,
and used my trusty exacto knife to cut out my opening.
Here's what it looks like after the opening is cut out.
You will need an insert piece for the inside of your card.
This needs to be 5" x 6". Score on the 6" side at 2" and 4".
My paper is double sided, so here you are seeing the blue back side of my
5" x 6" panel. Fold your panel in a valley and mountain fold, and apply adhesive to one end.
Leave a nice 'even' border around your panel, and adhere it to your
card base. It will look like this:
The on-line instructions I found, said to apply adhesive to your
focal piece next. Instead, I chose to 'close' my card, and apply the
adhesive to the inside panel that showed through the opening.
Here's what it looked like:
Now, place your focal image directly onto your opening, being
careful not to let go until you are sure of your placement.
Stamp your sentiment (be sure to stamp your sentiment prior
to adding the inside insert. Don't ask me how I know this :)
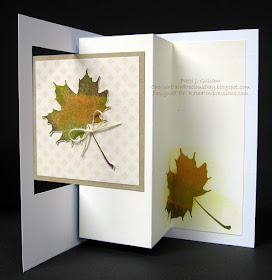
Here's the finished card standing up.
And here it is opened up.
I also stamped and sponged a bit on the inside of the card panel.
Thanks for taking the time to stop and look!
Check out my sidebar to see how you can save money on all of your
Repeat Impressions orders!
Hugs and smiles,
Patti J.


this is absolutely GORGEOUS!!!
ReplyDeletewait! before you know it, your grandchild will be 10. where the heck to the years go! enjoy them and spoil them!
have a great week.
hugs :)
what a beautiful fold and love the ink pad you used so creatively
ReplyDeleteCheers
Dr Sonia
Lovely card! I will have to try this! Thanks for sharing the details.
ReplyDeleteHugs!
Gorgeous!
ReplyDeleteWhat a cute idea! I love to work with special folds on my cards. Great fall colors. Thanks for sharing.
ReplyDeleteOh I think "we" might have to make this really really soon - cause I really really like it!!! Great tutorial.
ReplyDeleteWhat a darling card. Thank you for the tutorial. I hope to find time to do this.
ReplyDeleteAwesome! I'm going to try and give this one a go!
ReplyDeleteBeautiful card. thanks for the tutorial,
ReplyDeleteAwesome card and I am so glad you explained how you did it. But as to me figuring it out even after your tutorial, remains to be seen. I seldom do very complicated things as I am more of a CAS person. I never seem to have enough time in the day for them.
ReplyDeleteThanks for the tutorial Patty
ReplyDeleteYour leaves looks like a real one woooww I love love this card
Hugs
Monkma
I mean Monika hihi I wrote from my mobile phone sorryyy...but I love your card as I told hehe...shy me..wrong typing..
ReplyDeleteFabulous fold and image, so glad you did a tutorial!
ReplyDeleteWow, Patti....your project is incredible! I've never seen this before, but know I'll have to give it a try! Thanks for all your inspiration, my friend!
ReplyDeleteBeautiful fall card. Love the leaves and the rich colors on them... great folds and cuts. Gives a nice touch to your card.
ReplyDeletegorgeous Autumn card, Patti! Thanks foe the tutorial. hugs, Helena
ReplyDeleteI wonder if I could make a interactive ATC sized card like this? Will have to play. Thanks for the directions as I may have to refer back to them. =0)
ReplyDeleteWow Patti this is so beautiful - I'm pinning in for the future. Thanks so much for being an inspiration.
ReplyDeleteYou made those leaves so beautiful, Patti...just like the real ones out there now!
ReplyDeleteWhat a great card, Patti!
ReplyDeleteWow!! Absolutely gorgeous Patti!! I love your stunning leaves with the colors and your fancy card fold looks really stunning! I've seen them before, but have never attempted one! Thanks for sharing!! HUGS :)
ReplyDeleteOooheee Patti .. I was sure that was a real leaf in your first PIC!! Absolutely beautiful card my friend! Xx
ReplyDeleteOh wow, Patti, those leaves look real. Beautiful stamping! Thank you for sharing the instructions of this card. I'm gong to attempt making one! It's such a fun fold.
ReplyDeleteHugs,
Lena
Lena’s Creations
Wow, this is great! Thanks, it's now on the 'to do' list!
ReplyDeleteFabulous! Thanks for the tutorial too Patti!
ReplyDeleteLOVE THIS and it is so great that you shared the how-tos with us!!! You are a delight and I hope you have a incredible week!!!
ReplyDelete