Happy Monday!
Please scroll down for my Great Impressions Post!
Now.....where was I??? Oh!
It's my turn to share a Project of the Week, at The House that Stamps Built.
One of my most used techniques is what I call 'Shadow Stamping'. I'm not sure if that's
what it's really called, but that's my name for it. I love that it gives a bit of
movement and dimension to a stamped image.
Let me show you how it works:
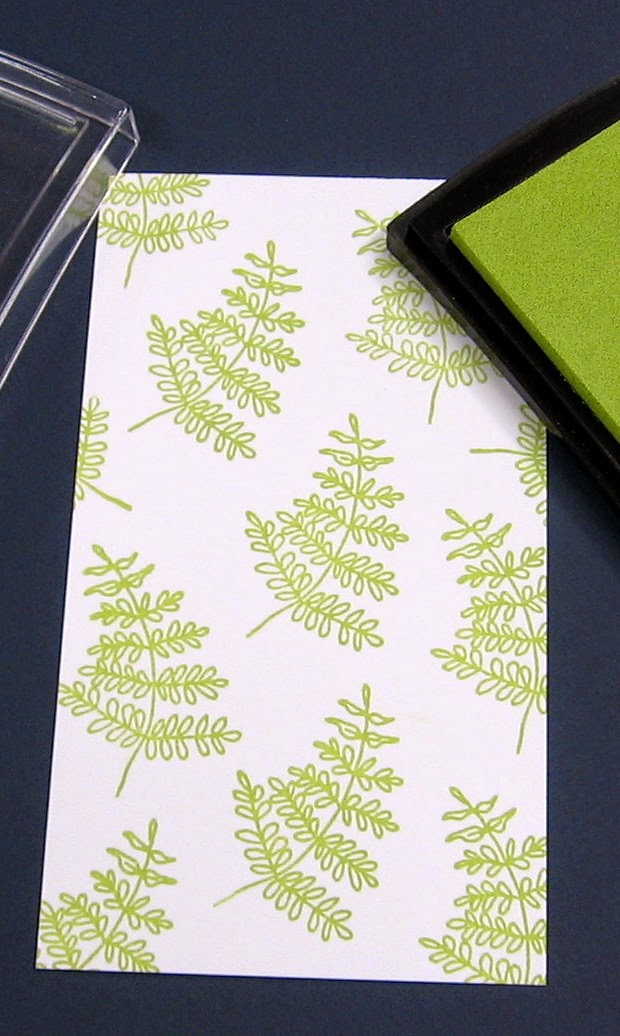
First, choose and stamp your image or sentiment. For today's example, I chose to
use the Repeat Impressions Fern 1708-G.
I stamped the fern in a light shade of green. I placed my Stamp-a-ma-jig over the original
image, but moved it slightly, dropping it down to resemble a shadow.
Once I had things lined up, I began stamping the ferns again, in a darker shade of green.
Can you see the difference in photo 1 and photo 3? Pretty, isn't it?
Now, let me show you a cute card I made, using this technique!
For this card, I used the following Halloween stamps:
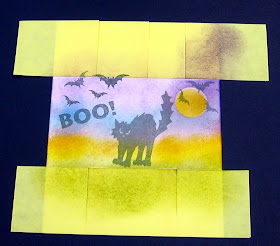
To begin, I cut a card front panel to 4" x 5.35", and masked off the top and bottom ends with
some small post-it notes. I masked off a circle (the moon), and did some sponging.
I removed the circle, and sponged in some yellow and gold, leaving a tiny ring at the top.
Next, using my Stamp-a-Ma-Jig for placement, I came in one at a time, with the black cat, bats, and BOO. They were stamped in London Fog, sort of creating a little eerie scene.
Next, using my Stamp-a-Ma-Jig, I again lined each stamp up, one by one. Once aligned,
I moved the image just a bit to the right and down, and stamped each one in Tuxedo Black,
creating a shadow on each image.
When the Post-its were removed, this was the result! Now, all that's left
to do, is finish the card.
I recently purchase a roll of itty bitty Washi Tape. I edged the stamped panel with the
Washi Tape, and then trimmed, leaving just a bit of white border at the top and bottom.
I matted the panel, added it to the card front with dimensional foam, and tied a Baker's Twine
bow at the top. Voila!!!
I use this technique a lot on sentiments. Sometimes, a sentiment needs just a touch of a pretty color dropping off of the black ink - give it a try!!!
Thanks for stopping by today - hope you will give this a try!
Let me know if you do, so I can drop by and leave you a bit of bloggy love!
Have a good day,
Patti J.
P.S. Did you know you can save money on your Repeat Impressions orders?
Check out my sidebar for details!
P.S.S. Did you notice my beautiful matting? Those nice straight lines were made using my
Perfect Layers Mini Rulers and Cutting Pad. Check out my sidebar to see how you can save money on your Perfect Papercrafting orders!!!


Thanks for the great tutorial.
ReplyDeleteWow!!! This is gorgeous! LOVING that background!!!!!!!!
ReplyDeleteGreat use of that stamp-a-mij tool Patti!! The background looks amazing!! I absolutely LOVE how you've made the spooky sky scene as well!! Thanks for sharing my friend! HUGS
ReplyDeleteI love the fern background and how you did the spooky card as well!
ReplyDeleteWow!! You always make everything look so easy! Thanks for the tutorial and I love those ferns! Love the SPOOKy sky too!
ReplyDeleteBeautiful pattern paper you created and I also love the great Halloween scene you created too.
ReplyDeleteWhat great creativity! Love the fern background you created and your Halloween scene is gorgeous! Love it, Patti.
ReplyDelete♥ Lena
Lena’s Creations
A wonderful technique revisited and what a super fun Halloween card you made with it!!
ReplyDeleteThanks for reminding us of something we learned then left behind when something else came along.
Hugs
Sue
I've never seen shadow stamping before. You taught me something new. It looks so pretty with the ferns.
ReplyDeleteLove your cat scene. The sky is beautiful.
Great work, Patti. Have a great day my friend.
A perfect Halloween card! Thanks so much for teaching us all your favorite techniques. I love learning from you, Patti!
ReplyDeletefeel so halloween looking at your card Patti
ReplyDeleteand great tutorial
I did it with my stencil colored with white and other ink on the cardstock
great post Patti
hugs, Monika